Contents tagged with English
-
Launch Windows Terminal from Emaroo
Emaroo is a free utility for browsing most recently used (MRU) file lists of programs like Visual Studio, VS Code, Word, Excel, PowerPoint, Photoshop, Illustrator and more. Quickly open files, jump to their folder in Windows Explorer, copy them (and their path) to the clipboard - or run your own tools on files and folders with custom actions!
Download Emaroo on www.roland-weigelt.de/emaroo
Custom action for Windows Terminal
This custom action will open the Windows Terminal in the directory of the currently selected item (tested with Preview v0.9.433.0)
How to add the custom action
Copy the following text into the clipboard:
§§!F5[*J,mvXzzR?kMYxAy.pM#x1FkZTe*n?d3a#u^[?N^ZKFdQKYe|}Qt?atakKFwNwoCXCJX*iF;lO
tCo57uK:568nq7LG*=^ctZtQ5k6!,cjG5C2M6*snN,D48|-q:y01mlN^y(rkgxt~A_]mYA3ZkY6!fKX5
;WsSVpA^]I|+#|E%:DJ_LGLP.2*$M3Ad2~]cow]pWH!o!!§§
Open Emaroo and click on the “
 ” icon to switch to the settings tab.
Emaroo recognizes the text in the clipboard as a custom action and lets you paste it into the list of actions for the selected application (in this case Visual Studio Community 2019).
Here’s the result:
How to use the custom action
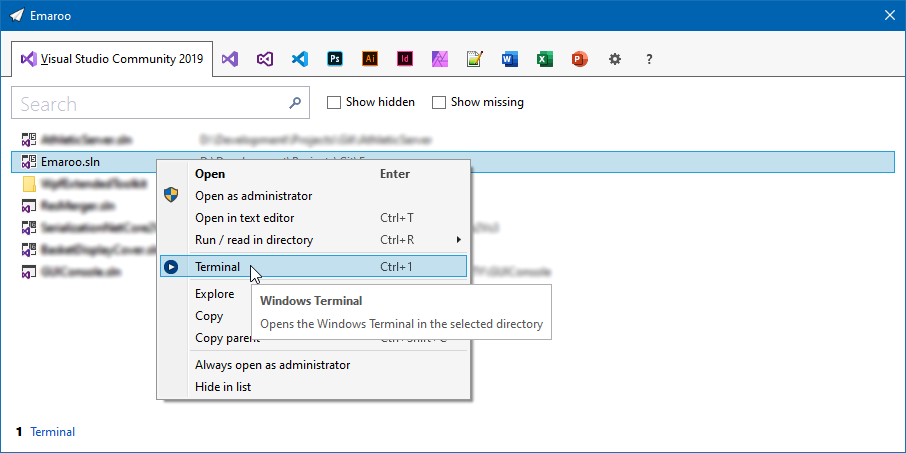
On the tab with the application’s most recently used items, the custom action is either available via the context menu of the item (shown in the first screenshot) or at the bottom of the window:
You can either click it:
Or press Ctrl+<number> (in this case Ctrl+1).
How to edit the custom action
Right-click the custom action to open the context menu or switch to the settings tab and select the custom action. In both cases, click the “
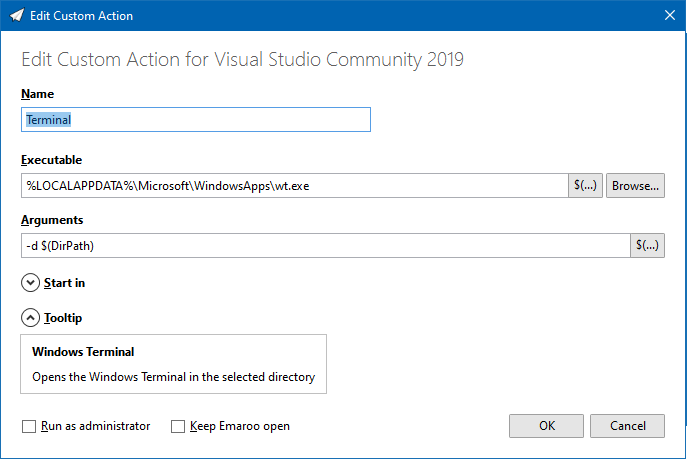
 ” icon to open the edit dialog:
Note: At the time of this writing, checking “Run as administrator” does not work for Windows Terminal (see issue #3145 on microsoft/terminal).
-
Quick #if … #endif in Visual Studio
In my previous blog post “Commenting out Code in C# (Oldie but Goldie Tip)” I recommended using “#if … #endif” to disable code lines.
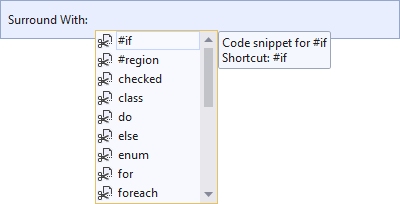
A quick way to do this in Visual Studio:
-
Commenting out Code in C# (Oldie but Goldie Tip)
I usually “comment out” code
- when something does not work as expected and I am looking for a workaround, or
- when I want to quickly try out an idea for an alternative solution
and
- I feel that using source control is too much hassle for what I’m trying to do in this situation.
How?
The term “comment out” obviously comes from using code comments to hide source code from the compiler. C# has two kinds of comments that can be used for this, each with their pros and cons:
- End-of-line comments (“// this is a comment”) can be nested, i.e. you can comment a commented line. But they do not explicitly convey the start and the end of a commented section when looking at adjacent commented lines.
- Block comments (“/* this is a comment, possibly spanning several lines */”) do have an explicit start and end, but cannot be nested; you cannot surround a block comment with a block comment.
For disabling full lines of code, a different approach is to use the “#if … #endif” directive which tells the C# compiler to consider the code inside only if the specified symbol is defined. So to disable code, you simply specify a symbol that does not exist:
#if SOME_UNDEFINED_SYMBOL
	...one or more lines...
#endif
Using the preprocessor for this purpose is nothing new, especially to those with a C/C++ background. On the other hand, considering how often I watch developers use comments in situations where “#if” would have clear advantages, maybe this blog post benefits at least some people out there.
Why #if?
“#if” directives can be nested
The C# compiler does not blindly look for a closing “#endif”; it understands which “#endif” belongs to which “#if”, so e.g. the following is possible:
#if DISABLED
	...some code...
#if DEBUG
	...debug code...
#endif
	...some code...
#endif
You can express why you disabled a specific block of code
For example, you could use “#if TODO” when you are working on new code, but want to quickly run the program again without that code before continuing.
Something like “#if TO_BE_DELETED” (or maybe “#if DEL” for less typing) could mark code that you intend to remove after compiling the project and running the unit tests. If you are consistent with the naming of the symbol, performing a cleanup across the project is easy, because searching for “#if SYMBOL“ works well.
Obviously, you could choose more descriptive symbols (e.g. “#if TODO_DATA_ACCESS” and “#if TODO_CACHING") to differentiate different places of ongoing work. But if you think you need this, it could be a sign you are trying to juggle too many balls at once.
“#else” is great while you work on replacing code
Sometimes, when I have to deal with a non-obvious or even buggy third-party API, writing code involves a lot of experimentation. Then I like to keep old code around as a reference for a moment:
#if OLD_WORKAROUND
	...old code...
#else
	...new code...
#endif
You can easily toggle code on/off
You can enable the disabled code simply by defining the symbol, either using “#define” in the same source file or as a conditional compilation symbol for the whole project.
Alternatively, you can invert the condition for a specific “#if” with a “!” in front of the symbol:
#if !DISABLED
	...some code...
#endif
Being able to quickly switch code off and back on, or – in conjunction with “#else” – to switch between old and new code without losing the exact start and end positions of the code blocks is a huge plus. I use this e.g. when working on interactions in GUIs where I have to decide whether the old or the new code makes the user interface “feel” better.
Notes on disabled code
- Disabled code in a code base should always be viewed as a temporary measure, because code that never gets compiled “rots” over time. To the compiler/IDE, disabled code is plain text that is not affected by refactoring or renaming, i.e. at some point it is no longer valid.
- Try to get rid of disabled code as soon as possible, preferably before committing to source control.
- Last, but not least: Consider using source control for what it is good at - it exists for a reason. For instance, when experiments involve changes to many files, a new branch may be the better choice.
-
Notes on Migrating a WPF Application to .NET Core 3.0
Recently, I migrated a WPF application from .NET Framework 4.7.2 to .NET Core 3.0, which took me about two hours in total. The application consisted of four assemblies (one EXE, one UI class library, two other library assemblies).
A Google search for “migrate wpf to .net core 3” brings up enough helpful documentation to get started, so this post is mainly a reminder to myself what to look out for the next migration – which may be far enough in the future that I’ll have forgotten important bits by then.
How to get started
My starting point was the Microsoft article “Migrating WPF apps to .NET Core”. A lot of text, which makes it easy to get impatient and start just skimming for keywords. Tip: Do take your time.
In my case, I somehow missed an important detail concerning the
AssemblyInfo.csfile at first.AssemblyInfo.cs
When you migrate to .NET Core and use the new project file format, you have to decide what you want to do about the
AssemblyInfo.csfile.If you create a new .NET Core project, that file is autogenerated from information you can enter in the “Packages” section of the project properties in Visual Studio (the information is stored in the project file).
In the .NET Framework version of the UI class library, I used the attributes
XmlnsDefinitionandXmlnsPrefixto make the XAML in the EXE project prettier. That’s why I wanted to keep using anAssemblyInfo.csfile I could edit manually. For this, I had to add the following property:<GenerateAssemblyInfo>false</GenerateAssemblyInfo>
PreBuild Step
I use a pre-build step in my UI library project (calling a tool called ResMerger), After the migration, macros like
(ProjectDir)were no longer resolved. The migration document does not cover pre/post build events (at the time of this writing). But the article “Additions to the csproj format for .NET Core” does, in the section “Build events”.PreBuild event in the old csproj file:
<PropertyGroup>
    <PreBuildEvent>"$(SolutionDir)tools\ResMerger.exe" "$(ProjectDir)Themes\\" $(ProjectName) "Generic.Source.xaml" "Generic.xaml"
    </PreBuildEvent>
</PropertyGroup>
And in the new csproj file:
<Target Name="PreBuild" BeforeTargets="PreBuildEvent"> <Exec Command=""$(SolutionDir)tools\ResMerger.exe" "$(ProjectDir)Themes\\" $(ProjectName) Generic.Source.xaml Generic.xaml" /> </Target>Note that the text of the PreBuild step is now stored in an XML attribute, and thus needs to be XML escaped. If you have a lot of PreBuild/PostBuild steps to deal with, it’s maybe a good idea to use the Visual Studio UI to copy and paste the texts before and after migrating the project file.
WPF Extended Toolkit
My application uses some controls from the Extended WPF Toolkit. An official version for .NET Core 3 has been announced but is not available yet. For my purposes I had success with a fork on https://github.com/dotnetprojects/WpfExtendedToolkit, your experience may be different.
Switching git branches
Switching back and forth between the git branches for the .NET framework and .NET Core versions inside Visual Studio results in error messages. To get rid of them, I do the typical troubleshooting move of exiting Visual Studio, deleting all
binandobjfolders, restarting Visual Studio and rebuilding the solution. Fortunately, I don’t need to maintain the .NET framework in the future. The migration is done and I can move on.Automating the project file conversion
For the next application, I’ll likely use the Visual Studio extension “Convert Project To .NET Core 3” by Brian Lagunas. I installed the extension and ran it on a test project – a quick look at the result was promising.
-
JSON Serialization in .NET Core 3: Tiny Difference, Big Consequences
Recently, I migrated a web API from .NET Core 2.2 to version 3.0 (following the documentation by Microsoft). After that, the API worked fine without changes to the (WPF) client or the controller code on the server – except for one function that looked a bit like this (simplified naming, obviously):
[HttpPost]
public IActionResult SetThings([FromBody] Thing[] things)
{
    ...
}
The
Thingclass has anItemsproperty of typeList<Item>, theItemclass has aSubItemsproperty of typeList<SubItem>.What I didn’t expect was that after the migration, all
SubItemslists were empty, while theItemslists contained, well, items.But it worked before! I didn’t change anything!
In fact, I didn’t touch my code, but something else changed: ASP.NET Core no longer uses Json.NET by NewtonSoft. Instead, JSON serialization is done by classes in the new System.Text.Json namespace.
The Repro
Here’s a simple .NET Core 3.0 console application for comparing .NET Core 2.2 and 3.0.
The program creates an object hierarchy, serializes it using the two different serializers, deserializes the resulting JSON and compares the results (data structure classes not shown yet for story-telling purposes):
class Program
{
    private static Item CreateItem()
    {
        var item = new Item();
        item.SubItems.Add(new SubItem());
        item.SubItems.Add(new SubItem());
        item.SubItems.Add(new SubItem());
        item.SubItems.Add(new SubItem());
        return item;
    }
    static void Main(string[] args)
    {
        var original = new Thing();
        original.Items.Add(CreateItem());
        original.Items.Add(CreateItem());


        var json = System.Text.Json.JsonSerializer.Serialize(original);
        var json2 = Newtonsoft.Json.JsonConvert.SerializeObject(original);
        Console.WriteLine($"JSON is equal: {String.Equals(json, json2, StringComparison.Ordinal)}");
        Console.WriteLine();

        var instance1 = System.Text.Json.JsonSerializer.Deserialize<Thing>(json);
        var instance2 = Newtonsoft.Json.JsonConvert.DeserializeObject<Thing>(json);

        Console.WriteLine($".Items.Count: {instance1.Items.Count} (System.Text.Json)");
        Console.WriteLine($".Items.Count: {instance2.Items.Count} (Json.NET)");
        Console.WriteLine();
        Console.WriteLine($".Items[0].SubItems.Count: {instance1.Items[0].SubItems.Count} (System.Text.Json)");
        Console.WriteLine($".Items[0].SubItems.Count: {instance2.Items[0].SubItems.Count} (Json.NET)");
    }
}
The program writes the following output to the console:
JSON is equal: True

.Items.Count: 2 (System.Text.Json)
.Items.Count: 2 (Json.NET)

.Items[0].SubItems.Count: 0 (System.Text.Json)
.Items[0].SubItems.Count: 4 (Json.NET)
As described, the sub-items are missing after deserializing with System.Text.Json.
The Cause
Now let’s take a look at the classes for the data structures:
public class Thing
{
    public Thing()
    {
        Items=new List<Item>();
    }

    public List<Item> Items { get; set; }
}

public class Item
{
    public Item()
    {
        SubItems = new List<SubItem>();
    }

    public List<SubItem> SubItems { get; }
}

public class SubItem
{
}
There’s a small difference between the two list properties:
- The
Itemsproperty of classThinghas a getter and a setter. - The
Subitemsproperty of classItemonly has a getter.
(I don’t even remember why one list-type property does have a setter and the other does not)
Apparently, Json.NET determines that while it cannot set the
SubItemsproperty directly, it can add items to the list (because the property is not null).The new deserialization in .NET Core 3.0, on the other hand, does not touch a property it cannot set.
I don’t see this as a case of “right or wrong”. The different behaviors are simply the result of different philosophies:
- Json.NET favors “it just works.”
- System.Text.Json works along the principle “if the property does not have a setter, there is probably a reason for that.”
The Takeways
- Replacing any non-trivial library “A” with another library “B” comes with a risk.
- Details. It’s always the details.
- Consistency in your code increases the chances of consistent behavior when something goes wrong.
- The
-
ToolTip ToolTip toolTip
While working on a WPF control that handles some aspects of its (optional) tooltip programmatically, I wrote the following lines:
if (ToolTip is ToolTip toolTip)
{
  // … do something with toolTip …
}
This makes perfect sense and isn’t confusing inside Visual Studio (because of syntax highlighting), but made me smile nevertheless.
Explanation:
- The code uses the “is” shorthand introduced in C# 7 that combines testing for “not null” and the desired type with declaring a corresponding variable (I love it!).
- The first “ToolTip” is the control’s ToolTip property (FrameworkElement.ToolTip), which is of type “object”.
- The second “ToolTip” is the class “System.Windows.Control.ToolTip”.
-
Speakers, Check Your Visual Studio Code Theme!
tl;dr: If you use Visual Studio Code in your talk, please do the audience a favor, press Ctrl+K, Ctrl-T and choose the theme that best fits the lighting situation, not your personal taste.
Some people like “dark” UI color schemes, i.e. dark background with light text and icons. Others prefer black text on light background. Visual Studio 2019 comes with a light theme by default, Visual Studio Code with a dark theme. So, what is better?
As long you are on your own at work or at home, the answer is “whatever gives you the best experience”.
But as soon as you speak at a conference or a user group meetup, or maybe just in front of your colleagues, it’s no longer about you. It’s about what is best for your audience.
Source code is different from slides
When you are showing source code in a talk, you must find a compromise between the font size and the amount of text that is visible without too much horizontal scrolling. The result is usually a font size that is smaller than what you would use on a PowerPoint slide. That means that each character consists of far less pixels that either lighten or darken the screen. Which would not a problem per se, if we only had to care about the legibility of white text on dark background or black text on light background.
But source code is usually shown with syntax highlighting, i.e. as text that switches between a variety of colors. Because not all colors have an equal brightness, some parts of the source code can be much harder to read than other. This is especially true with dark themes, when the “dark” background does not appear as dark in the projection as intended, because of a weak projector and/or a bright room. The weaker contrast appears even worse when the colored text stands between white text – exactly the situation with syntax highlighting.
Care about legibility first
Proponents of dark themes cite the reduced eye strain when using a dark background. And they are right, staring at a bright screen in a dark room for a long time can be painful. On the other hand, first make sure the audience members in the back do not have to look twice because parts of the source code are hard to read.
Personally, in all the sessions I attended, I had more problems reading source code on dark-themed IDEs than I suffered from eye strain. Your experience may be different, of course.
Don’t theorize, test
When you set up your computer in the session room before the talk, not only check the font size, but also how well both dark and light themes are readable.
Fortunately, you can switch Visual Studio Code’s color scheme quickly. So, before your talk
- press Ctrl+K, Ctrl+T (or choose File > Preferences > Color Theme in the main menu)
- use the up/down cursor keys to select a theme (e.g. “Light+” or “Dark+”, Code’s default)
- and press Enter to use the theme.
Walk to the back of the room and look for yourself. And… be honest.
It’s not about “it ain’t that bad”
When you test your favorite theme in the room, don’t go for “it’s good enough” just because you like that theme. Switch to a different theme and make an honest assessment: Is “your” theme really better in this room, for this lighting situation? If not, choose another theme.
Thank you!
-
Emaroo: How to Get Visual Studio Code’s New Icon
Emaroo is a free utility for browsing most recently used (MRU) file lists of programs like Visual Studio, Word, Excel, PowerPoint and more. Quickly open files, jump to their folder in Windows Explorer, copy them (and their path) to the clipboard - or run your own tools on the MRU items! And all this with just a few keystrokes or mouse clicks.
- Download Emaroo on www.roland-weigelt.de/emaroo
Emaroo vs. Icons
The May 2019 update for Visual Studio Code (version 1.35) features a new application icon. After installing the update, Emaroo will continue to use the old icon, though.
This is because Emaroo caches the icons of executables (as well as those of MRU files and folders) for a faster startup.
To get the new icon, switch to the “settings” page…
…and click “Refresh icons” in the bottom right corner:
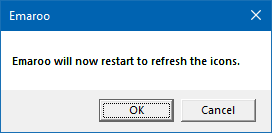
Confirm you want to restart Emaroo…
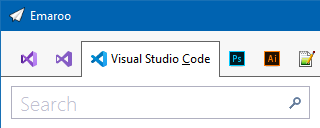
…and the new icon (which is not exactly dramatically different) will appear after Emaroo has refreshed the icons:
-
Interesting Read: The future UWP
Morton Nielsen wrote an article called “The future UWP” about the situation for desktop UI development in the Microsoft technology stack which I found very interesting.
The main takeaways (not actually surprising):
- A lot is happening/changing/developing and it will take some time until the future really becomes clear.
- Quote: “Whether you do WPF, WinForms or UWP, if it works for you now, continue the course you’re on”
Personally, I’ll stay with WPF for my desktop UIs. When .NET Core 3 comes out, I’ll dip a toe into porting my applications.
-
Emaroo 4.4 – Support for Visual Studio 2019
Emaroo is a free utility for browsing most recently used (MRU) file lists of programs like Visual Studio, VS Code, Word, Excel, PowerPoint, Photoshop, Illustrator and more. Quickly open files, jump to their folder in Windows Explorer, copy them (and their path) to the clipboard - or run your own tools on files and folders with custom actions!
- Download Emaroo on www.roland-weigelt.de/emaroo
About this Release
- Added: Support for Visual Studio 2019.
- Added: The “run or read” feature (Ctrl+R) now also supports “.lnk” files.
Fixed: Single files not appearing in Visual Studio Code’s MRU list.
